SALT-LESS SAUCE. I make an almost sodium free Marinara sauce that's very good and costs less than one dollar. I use two small cans of no-sodium tomato paste and mix in four cans of water. Then, I add one teaspoon of garlic power, 1/8 teaspoon of black pepper, one tablespoon of Italian seasoning and 1/4 teaspoon of sugar and stir until smooth. I cook the sauce over medium heat until it has thickened and serve. ~Susie W., Kansas
source: Everyday Cheapskate Newsletter

Wednesday, June 24, 2009
Chicken Tikka Masala
Chicken Tikka Masala |
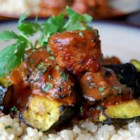 Prep Time: 30 Minutes Cook Time: 50 Minutes Ready In: 2 Hours 20 Minutes Servings: 4 |
"This is an easy recipe for Chicken Tikka Masala - Chicken marinated in yogurt and spices and then served in a tomato cream sauce."
Ingredients:
1 cup yogurt 1 tablespoon lemon juice 2 teaspoons ground cumin 1 teaspoon ground cinnamon 2 teaspoons cayenne pepper 2 teaspoons freshly ground black pepper 1 tablespoon minced fresh ginger 4 teaspoons salt, or to taste 3 boneless skinless chicken breasts, cut into bite-size pieces 4 long skewers | 1 tablespoon butter 1 clove garlic, minced 1 jalapeno pepper, finely chopped 2 teaspoons ground cumin 2 teaspoons paprika 3 teaspoons salt, or to taste 1 (8 ounce) can tomato sauce 1 cup heavy cream 1/4 cup chopped fresh cilantro |
Directions:
| 1. | In a large bowl, combine yogurt, lemon juice, 2 teaspoons cumin, cinnamon, cayenne, black pepper, ginger, and 4 teaspoons salt. Stir in chicken, cover, and refrigerate for 1 hour. |
| 2. | Preheat a grill for high heat. |
| 3. | Lightly oil the grill grate. Thread chicken onto skewers, and discard marinade. Grill until juices run clear, about 5 minutes on each side. |
| 4. | Melt butter in a large heavy skillet over medium heat. Saute garlic and jalapeno for 1 minute. Season with 2 teaspoons cumin, paprika, and 3 teaspoons salt. Stir in tomato sauce and cream. Simmer on low heat until sauce thickens, about 20 minutes. Add grilled chicken, and simmer for 10 minutes. Transfer to a serving platter, and garnish with fresh cilantro. |
| SOURCE: ALLRECIPES |
Sunday, June 21, 2009
Broccoli Tortelini Salad
SOURCE: Tina Eisenhart
I got this recipe from my friend Tina and it is out of this world good!!! It has become a favorite at potlucks.
Tina's Broccoli Tortellini Salad
I got this recipe from my friend Tina and it is out of this world good!!! It has become a favorite at potlucks.
Tina's Broccoli Tortellini Salad
This is how i made it , you can use what you want to as I make it low fat and low calorie.
Ingredients
6 tablespoons of Hormel bacon bit
1 Bag of frozen Cheese tortellini (I've used frozen ravioli as well, works fine)
1/2 cup reduced fat Miracle Whip
2 tablespoons apple cider vinegar
1 bag(12 oz) Broccoli slaw ( or can use chopped fresh or frozen broccoli)
1 cup raisins
1 cup of roasted, unsalted Sunflower seeds
1 red onion finely chopped.
1. Cook frozen cheese tortellini as directed on package
2. in a small bowl mix together miracle whip and vinegar to make the dressing.
3. In a large bowl combine broccoli, tortellini, bacon, raisins, seeds and onion.
4. Pour dressing over and toss.
5. Refrigerate overnight. I put it in a good container like tupperware or a tight fitting jar and store it upside down as then the dressing does not just settle to the bottom.
SOURCE: Justina Eisenhart
Chocolate Dump Cake
Chocolate Dump Cake
2 cups flour2 cups sugar
1 teaspoon baking soda
1/2 teaspoon salt
2 eggs
5 tablespoons cocoa
1 cube margarine melted in 1 cup water
1/2 cu milk soured wit 1 teaspoon vinegar
1 teaspoon vanilla
Melt margarine in water. Sour your milk. dump all ingredients in bowl. Mix well. Bake in greased and floured pan at 350 degrees for about 30 minutes or until your toothpick comes out clean.
This is an old recipe that my mom used to make a lot. It doesn't say what size pan . I think a 9x11 or perhaps a 9x 13. I am guessing, so the first time you try this ,make your batter before preparing pan and you can probably judge the pan size by the amount of batter you have.
SOURCE: http://missmamievioletskitchen.blogspot.com/
BLT Pasta Salad
BLT Pasta Salad
Recipe courtesy Food Network Magazine
Ingredients
• 2 ounces corkscrew-shaped pasta (or any shape yoiu have on hand)
• 1/2 cup milk
• 12 ounces lean bacon
• 3 medium ripe tomatoes, cut into chunks
• 1 tablespoon chopped fresh thyme
• 1 clove garlic, minced
• Kosher salt and freshly ground pepper
• 1/2 cup mayonnaise
• 1/4 cup sour cream
• 4 tablespoons chopped chives or scallion greens
• 5 heads Bibb lettuce, quartered, or 5 cups chopped romaine hearts
Directions
Cook the pasta in a large pot of salted boiling water as the label directs. Drain and toss with the milk in a large bowl; set aside.( Tossing the pasta with milk keeps it from getting gummy)
Meanwhile, cook the bacon in a large skillet over medium-high heat until crisp.
Drain on paper towels. Discard all but 3 tablespoons drippings from the pan. Add the tomatoes, thyme and garlic to the pan and toss until warmed through; season with salt and pepper. Crumble the bacon into bite-size pieces; set aside 1/4 cup for garnish. Toss the remaining bacon and the tomato mixture with the pasta.
Mix the mayonnaise, sour cream and 3 tablespoons chives with the pasta until evenly combined. Season with salt and pepper. Add the lettuce; toss again to coat. Garnish with the reserved bacon and the remaining 1 tablespoon chives. Serve at room temperature.
Wagon Wheel Taco Pasta Salad
Wagon Wheel Taco Pasta Salad
1lb wagon wheel pasta
1 can black beans, drained and rinsed
1 10oz package frozen corn (I don't even bother thawing it, because I always make this at least a few hours before serving, so it plenty of time to defrost)
2 medium tomatoes, seeded and diced
8oz shredded Mexican-blend cheese
1 1/2 cups salsa
1/2 cup olive oil
3-4 tbsp lime juice
1 tbsp cumin
1-2 tsp chili powder
2 garlic cloves, minced
freshly ground salt & pepper
1/2 cup chopped fresh cilantro
1 avocado, diced
Cook the pasta al dente according to package directions. Drain and rinse with cold water.
In a large bowl, combine the black beans, corn, tomatoes, salsa, and cheese. Add the cooled pasta and mix well.
In another bowl, whisk together the olive oil, lime juice, garlic, cumin and chili powder. Pour over the pasta salad, add the cilantro, and mix well. Season to taste with salt & pepper.
Just before serving, stir in the diced avocado.
SOURCE: http://carascravings.blogspot.com/2009/05/wagon-wheel-taco-pasta-salad.html
Confetti Grain Salad
Adapted from Gourmet, June 2009. Feel free to use any grain here, or a combination of grains (just note that different grains may have different cooking times). Some suggestions: brown rice, wild rice, wheat berries, farro, spelt, or even whole wheat couscous or cooked bulgur wheat if you’re short on time.
For the salad:
 6 cups cooked Spelt berries*, cold or room temperature
 1 red bell pepper, diced
 1 orange bell pepper, diced
 1 cucumber, diced (about 1 cup)
 1 cup shredded or diced carrots
 1 bunch green onions, thinly sliced
 2 tbsp. chopped dill
 1 tbsp. chopped tarragon (or you favorite herbs)
For the dressing:
1/2 cup olive oil
2 tbsp. sherry vinegar
zest of 1 lemon
1 tbsp. salt
1 tsp. freshly ground pepper
Whisk the dressing ingredients together until well-combined. Set aside.
In a very large bowl, toss the salad ingredients together until well-combined. Drizzle with the dressing until evenly coated.
Serve or refrigerate for up to 3 days.
Makes 4 entree-sized portions or 8 side-sized portions.
*To cook Spelt berries, combine 2 cups uncooked grains with 6 cups water. Bring the water to a boil, cover and reduce to medium-low. Simmer until the spelt is tender, but still al dente (about 1 – 1.5 hours). If you’ve got a pressure cooker, you can also cook the grains in there for 40 minutes or so.
SOURCE: http://www.bitchincamero.com/mel/2009/06/confetti-grain-salad/
Fiesta Chicken Pasta Salad
I've been looking for inspiration for all of those picnics and potlucks coming up and this one sounds pretty good!
Fiesta Chicken Pasta Salad
1 pkg Hidden Valley Fiesta Ranch dip mix
½ c. oil
½ c. vinegar
Fiesta Chicken Pasta Salad
1 pkg Hidden Valley Fiesta Ranch dip mix
½ c. oil
½ c. vinegar
1 lb cooked, shredded chicken (about 1 ½ to 2 breasts)
3/4 box garden rotini
1 can black beans
1 can black olives, halved
2 -3 tomatoes, chopped
Frozen corn
Mix dressing mix, oil, and vinegar in small bowl and set aside. Combine chicken, cooked pasta, beans, olives, and tomatoes in large bowl. Add dressing and frozen corn about 20 minutes before serving. Be sure to toss again just before serving, as the dressing will seep to the bottom.
SOURCE: http://sisterscafe.blogspot.com/2008/06/fiesta-chicken-pasta-salad.html
Saturday, June 20, 2009
Frosty Summer Drink
SOURCE: Tina Eisenhart
1cup vanilla ice cream
1 package of favorite Kool Aid
couple of ice cubes
1 can of Sprite
Blend well and serve in glass.
1cup vanilla ice cream
1 package of favorite Kool Aid
couple of ice cubes
1 can of Sprite
Blend well and serve in glass.
Friday, June 19, 2009
Salt Free Seasoning "Salt"
Salt-Free Seasoning "Salt"
1 1/2 teaspoons garlic powder
1 1/2 teaspoons onion powder
1 1/2 teaspoons white pepper
1 1/2 teaspoons dry mustard
1 1/4 teaspoons paprika
1 teaspoon dried lemon peel
1 teaspoon ground black pepper
1 teaspoon celery seed
3/4 teaspoon dried thyme leaves
1/2 teaspoon dried oregano
SOURCE: Everyday Cheapskate NL
| |
Seafood Seasoning
Seafood Seasoning
Similar to pricey Old Bay Seasoning, this mix is fantastic for grilling all types of seafood.
2 teaspoons salt
1 teaspoon cayenne pepper
1 teaspoon ground celery seed
1 teaspoon sweet Hungarian paprika
1 teaspoon dry mustard
1 teaspoon ground black pepper
1 teaspoon ground bay leaf
1/4 teaspoon ground allspice
1/4 teaspoon ground ginger
1/4 teaspoon grated nutmeg
1/4 teaspoon ground cardamom
SOURCE: Everyday Cheapskate NL
BBQ Rub
All-Purpose Barbecue Rub
This spice rub is perfect on poultry, pork, seafood and many other varieties of meat.
1/4 cup coarse salt (kosher or sea)
1/4 cup dark brown sugar
1/4 cup sweet paprika
2 tablespoons freshly ground black pepper
SOURCE: Everyday Cheapskate NL
Santa Maria Style Rub
Rub for Santa Maria-Style Grilled Tri-Tip
Tri-tip is a cut of meat popularized in Santa Maria, located on the central coast of California. This cut, also known as bottom sirloin, is known for its full flavor, lower fat content and comparatively lower cost. Use this blend to coat a 2 1/2 pound beef tri-tip roast.
1 tablespoon salt
1 1/2 teaspoons garlic salt
1/2 teaspoon celery salt
1/4 teaspoon ground black pepper
1/4 teaspoon onion powder
1/4 teaspoon paprika
1/4 teaspoon dried dill
1/4 teaspoon dried sage
1/4 teaspoon crushed dried rosemary
SOURCE: Everyday Cheapskate NL
The Only Rub You'll Ever Need
The Only Rub You'll Ever Need
SOURCE: Woman's Day magazine
Here is a very versatile grilling rub for chicken, fish, pork or beef. Simply coat the item you'll be grilling with the rub and allow it to sit for 30 minutes before hitting the grill. This makes about 2/3 cup, which will season about four pounds of meat.
1/4 cup firmly packed brown sugar
1 tablespoon kosher salt
1 tablespoon chili powder
1 tablespoon paprika
2 teaspoons garlic powder
2 teaspoons onion powder
1 teaspoon cumin
1 teaspoon oregano
Thursday, June 18, 2009
Doris Chan's Killer Brownies
Doris Chan, for the unfamiliar, is a premier crochet designer. Her blog, http://doriseverydaycrochet.blogspot.com shows her wit and personality. I'd love to have her for a neighbor!!! Yarn addict anonymous? I am an addict. . .
Anyway she posted this brownie recipe and I couldn't resist sharing it with you here. These are definitely not low-fat but then again, it's brownies. Did you really expect them to be healthy????
Anyway she posted this brownie recipe and I couldn't resist sharing it with you here. These are definitely not low-fat but then again, it's brownies. Did you really expect them to be healthy????
Killer Brownies
Happy Birthday to me!
Here’s the recipe for the brownies I shared one night at the Big Bar on Two at TNNA Columbus 2009. Incredibly moist and meltingly smooth, these brownies should be kept refrigerated to extend freshness. They also freeze well. But that assumes there will be any left around to store. This pattern... uh, recipe... tells exactly how I make them, with specific ingredients to get the same results. Swap out at your own risk!
Skill Level No-Brainer
Size 8” by 8” square or 9” round, 1" deep; to serve a gang of crocheters, unless you are Ellen Gormley, in which case serves two
Materials
14 tablespoons (7 ounces [200 g]) unsalted butter, cold, in chunks (Land O’ Lakes)
3 ounces (85g) chopped bittersweet or dark chocolate (Ghirardelli semi-sweet dark)
1/2 cup plus 2 teaspoons (1.75 oz [50 g]) unsweetened Dutch process cocoa, lightly spooned into cup (Pernigotti, an Italian cocoa with a touch of Tahitian vanilla bean)
1 cup plus 3 tablespoons (8.25 oz [238 g]) granulated sugar
3 large eggs, room temperature
2 teaspoons vanilla extract (Penzey’s Double Strength)
3 ounces (85 g) cream cheese, softened (Philadelphia brand original)
1/2 cup (2.5 oz [71 g]) all purpose flour, stir flour in container, dip cup, lightly sweep off excess (King Arthur)
A pinch of salt
Tools
Baking pan, metal, 8” by 8” square (or alternately 9” round), 2” deep
Aluminum foil, 8” by 16” strip or parchment paper
Nonstick baking spray (Pam for baking)
Microwave for melting stuff
Microwaveable 2-cup measure or medium bowl
Stand mixer with paddle attachment, great to have but not critical (KitchenAid), or hand-held mixer plus a large mixing bowl
Thin bladed spatula for spreading batter
Wire cooling rack
Toothpick or cake tester
Gauge not critical
Instructions
Batter
Preheat oven to 325 degrees F.
Prepare 8” square baking pan by lining with aluminum foil, allowing a few inches overhang on sides for lifting brownies later. Alternately, line the bottom of the 9” round pan with a circle of parchment. Either way, spray sides and bottom of pan with baking spray (or grease lightly with a little butter or vegetable shortening).
Row 1 (RS): In a microwaveable 2-cup measure or medium bowl, place butter and chopped chocolate, microwave on high power until melted, approximately 1 1/2 minutes, stirring 2 or 3 times.
Row 2: Pour the butter mixture into a large mixing bowl (bowl of stand mixer fitted with paddle attachment) and beat in the cocoa -- 15 seconds at medium speed.
Row 3: Beat in the sugar until it is incorporated -- another 15 seconds.
Row 4: Beat in the eggs and vanilla until incorporated -- about 30 seconds more.
Row 5: Beat in the softened cream cheese until you can only see tiny bits -- about 15 seconds more.
Row 6: Sift in the flour and salt and mix only until the flour is fully moistened -- a few seconds at low speed.
Row 7: Scrape the batter into the prepared pan and spread it evenly with spatula.
Baking
Row 1: Place pan in the middle of oven, bake for 30 minutes. Batter should be set around the outside but the top should still look moist and shiny in the center. A toothpick inserted 1 inch from the edge will come out clean.
Note: Avoid overbaking.
Row 2: Place the pan on a wire rack and cool completely. That’s the hard part, cause this requires a couple of hours of smelling chocolate but not being able to eat it.
Finishing
With clean spatula, loosen brownies from sides of pan. Using the foil overhang, lift the brownies out of the pan. Alternately, turn the brownies out of the round pan, peel the parchment off the bottom of the brownie round, then invert so the top is again on top.
Weave in ends. Block brownies into 2” square servings, 16 squares. Or one huge shark-bite for Ellen. Enjoy!
Wednesday, June 17, 2009
Low-Fat Candy Bar Angel Cake
Low-Fat Candy Bar Angel Cake
Makes:12 servings
1 package Betty Crocker 1-step white angel food cake mix
1 cup fat-free (skim) milk
1 package 4-serving size milk chocolate instant pudding and
pie filling
2 cups frozen (thawed) reduced-fat whipped topping
1 bar (1.4 ounces) chocolate-covered toffee candy, chopped
Bake and cool cake as directed on package for angel food
cake pan (tube pan). Remove from pan.
Split cake horizontally to make 2 layers (To split, mark
side of cake with toothpicks and cut with long, serrated knife.)
Beat milk and pudding and pie filling (dry) in large bowl,
using wire whisk or hand beater, until blended.
Fold in whipped topping. Spread half of the chocolate
mixture between cake layers; spread remaining mixture
over top. Refrigerate at least 1 hour but no longer than 24 hours.
Sprinkle candy over top of cake just
before serving. Refrigerate any remaining cake.
Calories 225;Fat 3g;Chol 0mg;Sodium 400mg;Carb 44g;Fiber 0g;Protein 5g
Cream of Chicken Corn Chowder
Cream of Chicken Corn Chowder
Corn and chicken go so well together, just like love and marriage in the
song! Add some noodles to thicken this soup even more, and you've got a
culinary partnership whose flavor goes on forever! JoAnna M. Lund
Serves 4 (1 cup)
1 (10 3/4-ounce) can Healthy Request Cream of Chicken Soup
2 cups skim milk
1 cup frozen whole kernel corn, thawed
Scant 1 cup (1 1/2-ounces) uncooked noodles
1 teaspoon dried parsley flakes
1 teaspoon dried onion flakes
1 cup (5-ounces) diced cooked chicken breast
In a medium saucepan, combine chicken soup, skim milk, corn, uncooked
noodles, parsley flakes, and onion flakes. Bring mixture to a boil. Stir in
chicken. Lower heat and simmer for 15 minutes, or until noodles are tender,
stirring occasionally.
HINTS:
1. Thaw corn by placing in a colander and rinsing under hot water for one
minute.
2. If you don't have leftovers, purchase a chunk of cooked chicken breast
from your local deli.
Healthy Exchange: 1 1/4 Protein, 1 Bread, 1/2 Skim Milk, 1/2 Slider, 5
Optional Calories
235 calories, 3 gm fat, 20 gm protein, 32 gm carbohydrate, 394 mg sodium,
164
mg calcium, 1 gm fiber
Foodmover/diabetic: 2 starch, 1 meat, 1/2 skim milk
Recipe found in "Cooking Healthy with the Kids in Mind" by Joanna M. Lund
Dance Together
If I acknowledge my beauty & talent, I do not have to envy your gifts.
If I recognize my strengths, I don't need to emphasize your flaws.
When I am aware of my power, I can enjoy the differences & similarities
of your fire. We can promote each other, delight in each other.
Dance with each other. ~Christina Kadlec aka Magdalene
If I recognize my strengths, I don't need to emphasize your flaws.
When I am aware of my power, I can enjoy the differences & similarities
of your fire. We can promote each other, delight in each other.
Dance with each other. ~Christina Kadlec aka Magdalene
Help! My Crock-Pot cooks too fast!
SOURCE: http://crockpot365.blogspot.com/
HELP!
I've gotten quite a few emails lately asking what to do about a hot
crock, or a crockpot that cooks too quickly, and burns or dries out
food.
ick. I hate that.
First off, I'm sorry. So sorry.
There is nothing more defeating than thinking you have dinner all ready
to go and come home to a gross dried-out or charred mess. I'm really
sorry.
But, hopefully this will help, just a bit.
1) Make sure you are using the right size crockpot. A slow cooker needs
to be quite full in order to heat evenly and cook properly. I have only
used the brand name Crock-Pot slow cookers, and I'm thrilled that they
come in such a variety of sizes. I realize that storage space is at a
premium, but consider getting a smaller crockpot if you find that you
aren't filling your crock at LEAST 2/3 of the way full each time you
use it.
This goes against the bigger-is-better American mentality. I know. I'm sorry.
2) Start easy. Don't try out a pasta dish or a rice dish, or bleu
cheese and steak roll-ups for one of your first crockpot cooking
adventures. The reason they come with a little book full of stews and
soups is because they are easy and somewhat full-proof.
Try:
taco soup
beef stew
minestrone soup
lazy chicken
cream cheese chicken
white chili
enchilada casserole
sausage and vegetables
marinated meat
3) Cook for the shortest and lowest cooking time if you are going to be out of
the house.
huh?
I know, it doesn't make sense.
If you are going to be out of the house for 10 hours, and the cooking
time says 6-8 hours, don't set it for 10. Set it for 6, and then let it
stay on warm for the rest of the time you're going to be out of the
house. Worst case, the meal isn't quite done and you flip it to high
while you change your clothes and set the table.
The cooking time is a range. You have to get a feel of your crockpot
(which is why you should start with the easy ones, first) and figure
out due to your altitude, humidity, etc. how long things will take.
You will get a feel, I promise. I'm a complete dunder-head when it
comes to cooking, yet I can crockpot. You can, too. I promise.
4) But my crockpot doesn't switch to warm! If you don't have one of the
newer "smart" pots, and you plan on being out of the house for a long
period of time, you should really invest in one. I got my 6-quart
Crock-Pot Smart Pot for $29 at Target, and I've heard from readers that
they have been able to score them for *quite* cheap at garage sales or
on Craigslist.
Please read this story that was sent to me earlier in the year.
5) I've done all that and it's still way too hot and it's making my
countertop hot, and I think there's something wrong with it. Don't use
it. Call the manufacturer. Talk to the experts. I'm a mom who drinks
too much coffee and wears slippers all day. I can't fix it. I wish I
could. I'm sorry.
French Pot Roast
Thanks to my friend Iris for this recipe - I can't wait to try it.
1 (2-3) pound boneless beef chuck pot roast
1/2 teaspoon salt
1/2 teaspoon ground black pepper
1 tablespoon cooking oil
4 medium carrots peeled and cut crosswise into 3 inch pieces. ( I used whole fresh baby carrots I didn't count I just tried to use as many that would be equal to 4 regular sized carrots.)
3 medium potatoes unpeeled cut into quarters
2 medium or 1 large onion cut into wedges
2 tablespoons quick cooking tapioca
1 cup bottled French salad dressing
1/2 cup beef broth
1 clove garlic minced
Trim some of the fat from beef; ( It was my choice to leave some fat on, to insure tenderness and flavor.) Sprinkle with salt and pepper. Brown roast on all sides in hot oil in a large skillet.
Place carrots, potatoes, and onions in a 5 to 6 quart slow cooker. Sprinkle with tapioca. Place roast on vegetables. Combine salad dressing, broth, and garlic; pour over roast and vegetables.
Cover and cook on low-heat setting for 9 to 10 hours or on high heat setting for 4 1/2 to 5 hours.
( I cooked on high for first 90 minutes then set to low. Roast was done in 7 hours.)
Transfer beef and vegetables to a large serving platter. Serve beef and vegetables with the cooking liquid.
Makes approximately 8 servings.
Source; Slow Cooker Favorites a Better Homes and Gardens Special Interest Publication
http://missmamievioletskitchen.blogspot.com/This was really good. Had excellent flavor.
Sunday, June 14, 2009
Glaze of Glory Candied Carrots
Glaze of Glory Candied Carrots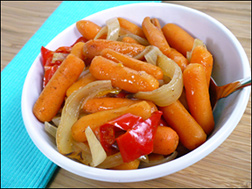 PER SERVING (1 cup): 94 calories, 1.25g fat, 286mg sodium, 21.5g carbs, 3g fiber, 10g sugars, 1g protein -- POINTS® value 1* PER SERVING (1 cup): 94 calories, 1.25g fat, 286mg sodium, 21.5g carbs, 3g fiber, 10g sugars, 1g protein -- POINTS® value 1*Let these babies cook all day! There are carrots, peppers, and onions in a fruity, yummy sauce. All the sweet goodness of glazed carrots without the gooey, gloppy, sugary calories. Ingredients: One 32-oz. bag (about 6 cups) baby carrots 1 onion, sliced 1 red bell pepper, sliced 1 yellow bell pepper, sliced 1/4 cup sugar-free apricot preserves (like the kind by Smucker's) 2 tbsp. brown sugar (not packed) 1 1/2 tbsp. light whipped butter or light buttery spread (like Brummel & Brown) 1 tbsp. cornstarch 1 tsp. cinnamon 1/2 tsp. salt, or more to taste 1/4 tsp. nutmeg Optional: black pepper, cayenne pepper, ground ginger Directions: Place all veggies in the crock pot. In a small dish, combine preserves, brown sugar, butter, cinnamon, salt, and nutmeg. Stir well. Top veggies in the crock pot with this mixture. Use a large spoon to stir the contents of the crock pot up a bit. (Don't worry if the preserves mixture isn't completely distributed.) Cover and cook on high for 3 - 4 hours OR on low for 7 - 8 hours, stirring occasionally (if you're around to do it; if not, it's okay). Once veggies are cooked, turn off the heat on the crock pot. Give contents a good stir, ensuring that the sauce is evenly distributed. In a small dish, combine cornstarch with 2 tbsp. cold water, and stir until cornstarch has dissolved. Add to crock pot and mix well. Leave pot uncovered for 15 minutes to allow sauce to thicken. Stir and, if you like, add additional salt and optional ingredients to taste. Then enjoy! MAKES 7 SERVINGS SOURCE: HUNGRY GIRL | ||||||
How to Freeze Fruit
How To Freeze Fruit
Getting Ready To Freeze Berries
Buying fruits in bulk when they are in season and then freezing them is a great way to save money on groceries (when they’re at their lowest price), this also lets you enjoy your favorite fruits year round. Freezing fruits is a method of food preservation that is much quicker than canning and no fancy or expensive kitchen gadgets are required. The majority of fruits freeze satisfactorily and it’s a simple task to accomplish.
Here’s my guide for freezing fruits, lots of tips, charts and information provided (including how to freeze many different varieties of fruit).
Tipnut’s Guide To Freezing Fruit
Freezing will not make poor products over into good ones, so select produce that is of good quality and is at the proper degree of maturity for good eating. For best results, prepare and freeze fruits immediately after harvesting or bringing home from the store.
In general, clean and cut up fruits as for eating or cooking. Prepare and pack fruits quickly and carefully, working with only enough fruits to fill 3 or 4 containers at a time to avoid loss of color, flavor and appearance.
Packing Fruit For Freezer Storage:
The intended use of the frozen fruit determines the type of pack, whether it be dry, sugar or syrup pack.
- Dry Pack: No sugar is added. This method is for those fruits which can be frozen without any preparation other than washing, draining, discarding imperfect ones and packing (e.g. blueberries, cranberries, currants, gooseberries, rhubarb). Tip: Many fruits and berries can be frozen on trays first before packaging for freezing. Place prepared fruit on a cookie sheet and freeze until solid. Once frozen, transfer to containers or bags then store in freezer.
- Sugar Pack: Dry sugar is added. Sprinkle sugar over the fruit, mix gently then allow fruit to stand for approximately 15 minutes (this draws out the juice and dissolves the sugar). It’s also fine to freeze immediately after sugar is added to fruit. Generally, 1/2 to 2/3 cups of sugar per quart of fruit is sufficient. Fruit pieces can also be frozen on trays first before packaging (sprinkle with sugar before freezing).
- Syrup Pack: Sugar and water are boiled to make a syrup, which is cooled and added to the fruit. Choose a syrup with a strength best suited to tartness of the fruit (syrup recipe chart is below). Slice or cut fruits directly into container. Leave berries whole, if desired. Add just enough syrup to cover fruit: Approximately 1/3 to 1/2 cup of syrup is needed for 1 1/2 cups of sliced fruit or berries; Approximately 3/4 to 1 cup of syrup is needed for halved fruit. Be sure that the syrup covers fruit completely and that headspace is left for expansion.
- Peeling Fruit: You may wish to peel fruit before freezing, an easy way to do that is to bring water to a boil then submerge the fruit in the water for about 45 seconds. Remove fruit and plunge into a sink full of ice cold water. Skins will come right off!
- Overripe Fruit: Try freezing these as purees, they can be used as dessert toppings and in other tasty ways. Fill icecube trays with puree then freeze. Once frozen, pop them out, put them in a freezer bag and store in the freezer. Take out a cube of fruit puree as needed.
Note: Sugar helps fruit keep its flavor, color and shape, but it is not necessary to prevent spoilage. The amount of sugar or syrup to use depends on the sweetness of the fruit and on individual taste.
Syrup Recipe Chart
To Make Syrup: Add sugar to boiling water and stir until dissolved. Chill before using.
| TYPE OF SYRUP | % SYRUP | SUGAR | WATER | YIELD |
| Very Light | 20% | 1 1/4 cups | 5 1/2 cups | 6 cups |
| Light | 30% | 2 1/4 cups | 5 1/4 cups | 6 1/2 cups |
| Medium | 40% | 3 1/4 cups | 5 cups | 7 cups |
| Heavy | 50% | 4 1/4 cups | 4 1/4 cups | 7 cups |
A 40% syrup is used for most fruits. Use a lighter syrup for mild flavored fruits and a heavier syrup for very sour fruits.
Syrup Tip: Up to one quarter of sugar may be replaced with an equal quantity of honey or corn syrup (use mild-flavored honey or white corn syrup for bland or light-colored fruits).
To Prevent Discoloration Of Fruits
Light colored fruits will likely darken when thawed, treating them with a bit of ascorbic acid (Vitamin C) will prevent this. Follow the package directions or you can use this as a guide:
Syrup Pack: Add 1/4 teaspoon powdered or crystalline ascorbic acid (Vitamin C) to 4 cups cold syrup and stir to dissolve.
Dry Sugar Pack: Dissolve 1/8 teaspoon ascorbic acid in 2 tablespoons cold water per 2 cups of prepared fruit; sprinkle over fruit and mix gently.
Citric acid or lemon juice can be used to help prevent fruit from darkening, but they aren’t as effective as ascorbic acid .
| Product | Preparation | Pack |
| Apples | Wash, pare, core, cut into slices. | Sugar Pack; Syrup Pack |
| Apricots | Wash, pit, cut in halves or quarters (can also be left whole). Peel if desired. | Sugar Pack; Syrup Pack |
| Blackberries | Rinse in cold water and sort. | Sugar Pack |
| Blueberries | Sort out imperfect berries, wash, stem and drain. | Dry Pack; Sugar Pack |
| Cantaloupe | Peel and cube. | Dry Pack; Syrup Pack |
| Cherries (Sour) | Wash and pit. | Sugar Pack; Syrup Pack |
| Cranberries | Wash and stem. | Dry Pack |
| Currants (Black or Red) | Wash and stem. | Sugar Pack |
| Fruit Salad | Use any combination of fruit. | Syrup Pack |
| Gooseberries | Stem, wash, crush slightly. | Sugar Pack |
| Grapes | Stem and wash. | Syrup Pack |
| Loganberries | Rinse in cold water and sort. | Sugar Pack |
| Peaches | Peel, pit and slice. Can be skinned first. | Sugar Pack; Syrup Pack |
| Pears | Peel, core, quarter. | Syrup Pack |
| Pineapple | Peel, remove core, slice or dice. | Syrup Pack |
| Plums | Wash, pit and cut in halves. | Sugar Pack; Syrup Pack |
| Raspberries | Rinse in cold water and sort. | Sugar Pack; Syrup Pack |
| Rhubarb | Wash & cut into 1″ lengths. | Dry Pack; Sugar Pack |
| Strawberries | Wash in cold water. Hull, slice or leave whole. | Sugar Pack; Syrup Pack |
*Choose a single method of packing where there is more than one option
Packaging Tips For Freezing:
- Use only moisture and vapor proof freezer containers or bags to prevent freezer burn and loss of flavor. Use containers when freezing fruits in syrup, freezer bags are great for dry or sugar pack.
- Account for food expansion, leave 1/2″ per pint or 1″ per quart headspace in containers when packing fruits in syrup. If the containers you are using have a narrow top, you’ll need to increase the headspace to accommodate.
- When using freezer bags, squeeze as much air as possible from the bags before sealing.
- To keep fruit pieces submerged in the syrup (if they float above it they will likely darken), crumple a piece of parchment paper, waxed paper or foil and place on top of fruit before sealing container.
- Make sure to label and date your packages before freezing. Another good idea is to mark the amount of sugar used so you’ll know the amount of sugar to adjust when using fruit in recipes.
How To Thaw Frozen Fruits
- Put on open shelf of refrigerator. A one-pound package will thaw in about 6 hours.
- Place package on kitchen counter. One pound will thaw in about three hours.
- If the package is watertight, it can be thawed in running cold water in 40 minutes.
- Watertight package of fruit can be thawed in running lukewarm water in about 20 minutes.
- Use fruits immediately once thawed.
- For best results, frozen fruits should be used within the year.
How To Use Fruits From The Freezer
Frozen fruits can be used as you would any sweetened fresh fruit, just as they come from the package–Jams, jellies and fruit pies turn out lovely when using frozen fruits. When using the fruit in recipes, remember to allow for the sugar added at time of freezing.
No matter how they are used, do not remove fruits from their cartons until ready to use them. All fruits keep their fresh-fruit flavor and color only a short time after opening and some fruits, such as peaches, darken quickly when exposed to the air.
Sources:
- Home Canning Guide, Dominion Glass Co. Limited
- A Guide To Good Cooking (Five Roses)
- Syrup Recipe Chart: Canning & Preserving For Dummies
Italian Layered Salad
Italian Layered Salad

Luscious layers of colorful veggies beg to be munched. This salad comes party-sized for those special occasions.
Prep Time: 20 min
Total Time: 2 hours 20 min
Makes: 16 servings
| 6 | cups bite-size pieces iceberg lettuce (1 pound) |
| 1 | bag (16 ounces) broccoli slaw (6 cups) |
| 1 | can (15 ounces) Green Giant® garbanzo beans, rinsed and drained |
| 1/2 | cup chopped red onion |
| 1 | medium red bell pepper, chopped (1 cup) |
| 1 | cup mayonnaise or salad dressing |
| 1/2 | cup creamy Italian dressing |
| 1/4 | cup shredded Asiago cheese (1 ounce) |
| 2 | tablespoons chopped fresh parsley |
| 1. | In deep 3-quart serving dish, layer lettuce, broccoli slaw, beans, onion and bell pepper. |
| 2. | Mix mayonnaise and Italian dressing until well blended. Spread over vegetables. Sprinkle with cheese. Cover and refrigerate at least 2 hours until chilled or overnight. Sprinkle with parsley just before serving. |
| How-To |
| Iceberg lettuce will keep up to one week in the refrigerator. If you plan to use the lettuce within a day or two, remove the core by striking the core end against a flat surface, then twisting the core and lifting it out. Hold the lettuce head, cored end up, under running cold water to separate and clean leaves, then turn it over and drain thoroughly. Refrigerate in sealed plastic bag or a bowl with an airtight lid. |
Nutrition Information:
1 Serving: Calories 185 (Calories from Fat 135); Total Fat 15g (Saturated Fat 3g, Trans Fat ncg); Cholesterol 10mg; Sodium 210mg; Total Carbohydrate 12g (Dietary Fiber 3g, Sugars ncg); Protein 4g Percent Daily Value*: Vitamin A 10%; Vitamin C 76%; Calcium 4%; Iron 6% Exchanges: 0 Other Carbohydrate; 2 Vegetable; 3 Fat Carbohydrate Choices: nc
*Percent Daily Values are based on a 2,000 calorie diet.
SOURCE: bettycrocker.com
*Percent Daily Values are based on a 2,000 calorie diet.
SOURCE: bettycrocker.com
Peanut Butter Fudge
Hungry Girls ’s 1-Point Chocolate Peanut Butter Fudge
Ingredients:
2 cups canned pure pumpkin
1 box Betty Crocker Fudge Brownies Mix (the 18.3-oz. Family Size box)
2 tbsp. peanut butter, room temp.
Directions:
Preheat oven to 350 degrees. Combine pumpkin with the brownie mix in a large bowl; stir until smooth (do not add anything else). Spray a small baking pan (8" X 8" work best - no larger!) with nonstick cooking spray and pour in the mixture. Spoon 2 tbsp. of Better ‘n Peanut Butter (room temperature) on top and use a knife to swirl peanut butter around. Cook for approximately 35 minutes. The batter will remain very thick and fudgy, and it should look undercooked. Remove from oven. Cover with aluminum foil and let cool in fridge for a couple of hours. Cut into 36 squares and serve.
Serving Size: 1 piece (approx. 1.3 oz.)
Calories: 63
Fat: 1g
Sodium: 56mg
Carbs: 13.5g
Fiber: 1g
Sugars: 9g
Protein: 1g
* 1 Point!
Freezing Cookies
http://whatscooking america.net/ Cookie/CookieTips.htm
Freezing Cookies:
For a longer storage you should freeze baked cookies in airtight freezer containers, freezer bags, or aluminum foil. NOTE: Don't use cardboard containers because they pick up freezer odors. They can be frozen up to twelve months.
First put a piece of waxed paper or foil in the bottom of the container. Then, place the cookies so they aren't touching and separate the layers with waxed paper or foil to protect. Seal tightly.
Before serving the cookies make sure you thaw them in their original freezer wrappings (so that condensation forms on the wrapping, not on the cookie). Crisp cookies may soften when thawed after freezing; to re-crisp, put them in a 300°F oven for 8 to 10 minutes.
Freezing unbaked cookie dough: Most cookie dough freeze extremely well and can be kept frozen for up to 3 months. The most important thing to keep in mind is that the dough will absorb any odd odors present in your freezer if it's not properly wrapped and sealed. To prevent this smell-sponge effect-as well as freezer burn-wrap the dough securely twice.
It's also a very good idea to write the type of cookie dough and the date it was frozen on the outside of the package. When you are ready to bake simply let the dough defrost in the refrigerator. This will take several hours, so plan ahead.
The cookie dough that freeze best are shortbreads, chocolate chip, peanut butter, refrigerator, sugar, and brownies, just to name a few. The types of cookie dough that do not freeze well are cake-like cookies and cookies that have a very liquidly batter, such as madeleines and tuiles.
When ready to use, the dough should be thawed in the refrigerator because it needs to be quite cold and firm to be cut into even slices. You can even slice it frozen if you want to, you just need a really sharp knife and a little elbow grease.
Tuesday, June 9, 2009
Healthified Mexican Skillet
"Healthified" Mexican Pasta Skillet
From eatbetteramerica.
| Prep Time:30 min |
| Start to Finish:30 min |
| makes:6 servings (about 1 1/3 cups each) |
| 1 | lb extra-lean (at least 93%) ground beef or turkey |
| 1 | jar (16 oz)salsa |
| 1 | cup tomato sauce (from 15-oz can) |
| 1 ½ | cups water |
| 2 | cups uncooked regular or multigrain elbow macaroni |
| 1 | cup Green Giant® Niblets® frozen corn |
| 1/2 cup shredded reduced-fat sharp Cheddar cheese (2 oz) | |
| In 12-inch skillet, cook beef over medium-high heat 5 to 7 minutes, stirring occasionally, until thoroughly cooked; drain. | |
| Stir in salsa, tomato sauce and water. Heat to boiling. Stir in macaroni and corn. Reduce heat; cover and simmer 12 to 15 minutes, stirring occasionally, until macaroni is tender. | |
| Sprinkle with cheese. Cover; let stand 1 to 2 minutes or until cheese is melted. |
Nutritional Information
1 Serving: Calories 370 (Calories from Fat 60); Total Fat 6g (Saturated Fat 2 1/2g, Trans Fat 0g); Cholesterol 45mg; Sodium 650mg; Total Carbohydrate 53g (Dietary Fiber 3g, Sugars 5g); Protein 25g % Daily Value*: Vitamin A 10%; Vitamin C 15%; Calcium 8%; Iron 20% Exchanges: 3 1/2 Starch; 0 Other Carbohydrate; 0 Vegetable; 2 Lean Meat Carbohydrate Choices: 3 1/2 MyPyramid Servings: 2 oz-equivalents Grains, 2 oz-equivalents Meat & Beans
*% Daily Values are based on a 2,000 calorie diet.
Subscribe to:
Posts (Atom)